Vignette and grain effects in CameraRaw
![]()
To the top
Simulate film grain
The Grain section of the Effects tab has controls for simulating film grain for a stylistic effect reminiscent of particular film stocks. You can also use the Grain effect to mask enlargement artifacts when making large prints.
Together, the Size and Roughness controls determine the character of the grain. Check grain at varying zoom levels to ensure that the character appears as desired.
For a video tutorial about using the Grain effect in Camera Raw, see The new Grain feature in CS5 by Matt Kloskowski or Black and white film grain in Photoshop and Lightroom by Dan Moughamian.

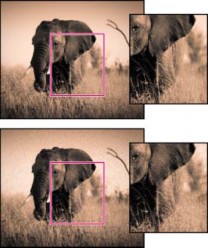
No grain applied (top), grain effect applied (bottom).
Amount Controls the amount of grain applied to the image. Drag to the right to increase the amount. Set to zero to disable grain.
Size
Controls grain particle size. At sizes of 25 or greater, the image may appear slightly blurred.
Roughness
Controls the regularity of the grain. Drag to the left to make the grain more uniform; drag to the right to make the grain more uneven.
To the top
Apply a postcrop vignette
To apply a vignette to a cropped image for artistic effect, use the Post Crop Vignetting feature.
For a video tutorial about creating postcrop vignettes in Camera Raw, see Vignetting in Camera Raw CS5 by Matt Kloskowski.
1. Crop your image. See Crop images.
426
2. In the Post Crop Vignetting area of the Effects tab, choose a Style.
Highlight Priority
Applies the postcrop vignette while protecting highlight contrast but may lead to color shifts in darkened areas of an
image. Appropriate for images with important highlight areas.
Color Priority
Paint Overlay
Applies the postcrop vignette while preserving color hues but may lead to loss of detail in bright highlights.
Applies the postcrop vignette by blending original image colors with black or white. Appropriate when a soft effect is desired
but may reduce highlight contrast.
3. Refine the effect by adjusting any of the following sliders:
Amount Positive values lighten the corners, negative values darken them.
Midpoint
Higher values restrict the adjustment to the area closer to the corners, lower values apply the adjustment to a larger area away
from the corners.
Roundness
Positive values make the effect more circular, negative values make the effect more oval.
Feather Higher values increase the softening between the effect and its surrounding pixels, lower values reduce the softening between the effect and its surrounding pixels.
Highlights (Available for a Highlight Priority or Color Priorityeffect when Amount is a negative value) Controls the degree of highlight “punch” in bright areas of an image, such as in the glow of a streetlight or other bright light source.
![]()
![]() Twitter™ and Facebook posts are not covered under the terms of Creative Commons.
Twitter™ and Facebook posts are not covered under the terms of Creative Commons.
Legal Notices | Online Privacy Policy
427